Home
Understanding the Electrocardiogram

Main navigation

  • Home
  • Understanding ECGs
    • Introduction
User account menu
  • Log in

Breadcrumb

  1. Home
  2. Understanding the Electrocardiogram In Health & Disease
  3. 10.0.0 The Electrocardiogram in the Emergency Department-Introduction
  4. 10.2.0 Shortness of breath (frame 23)

10.2.1 (24 -same as 23)

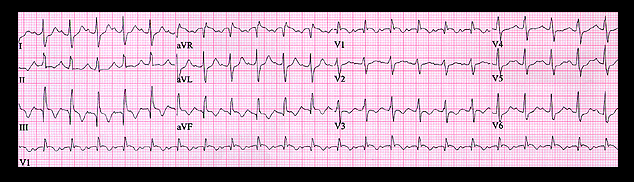
Her ECG is shown again here. There is sinus tachycardia with a rate of 140, a frontal plane axis of +90 degrees, and incomplete right bundle branch block. Note the S wave in lead I, the Q wave in lead III and the inverted T wave in lead III. This is referred to as the “S1- Q3- T3 pattern". It is quite characteristic of the ECG changes that accompany acute cor pulmonale and is sometimes seen in patients with an acute pulmonary embolus. The sinus tachycardia and incomplete right bundle branch block also occur in this setting. Her further evaluation revealed a large pulmonary embolus lodged in the right main pulmonary artery.

Book traversal links for 10.2.1 (24 -same as 23)

  • 10.2.0 Shortness of breath (frame 23)
  • Up
  • 10.2.2 (25)

Site is under construction

Book navigation

  • Introduction to First Edition
  • 1.0.0 Generation of the ECG
  • 2.0.0 The Normal Electrocardiogram
  • 3.0.0 Inter and intra-ventricular Conduction Disturbances
  • 4.0.0 Ventricular Hypertrophy
  • 5.0.0 ELECTROLYTE ABNORMALITIES, DRUG EFFECTS AND THE LONG QT SYNDROMES
  • 6.0.0 Ischemia and Infarction - Introduction (frame i and ii)
  • 7.0.0 Tachycardias- Introduction
  • 8.0.0 The Bradycardias frame i-introduction
  • 9.0.0 The ECG of Heart Murmurs-introduction
  • 10.0.0 The Electrocardiogram in the Emergency Department-Introduction
    • 10.1.0 Chest pain (1)
    • 10.2.0 Shortness of breath (frame 23)
      • 10.2.1 (24 -same as 23)
      • 10.2.2 (25)
      • 10.2.3 (26-same as 25)
      • 10.2.4 (26)
      • 10.2.5 (27)
      • 10.2.6 (27-again)
    • 10.3.0 Palpitations (frame 31)
    • 10.4.0 confusion, weakness etc (frame 40)
    • 10.5.0 Conclusion (no image)
Powered by Drupal